
For Team Leads
1. Log into the “Portal” for the appropriate market before creating an account. Clients will either fall under Dental, Chiro, Podiatry, or Other. The link for our three main market portals are listed below. Websites that do not fit into one of the three main markets are classified as “Other” and should be provisioned under the “Online Chiro” portal.
2. To create a new portal account, select “Create New Account” under the “Accounts” tab on the main menu.
- Fill out the profile using the client’s information from their Admin account page. Complete the profile in the following format:
- Market: Chiropractic, Podiatry, or Other
- Business Name: Use client’s name
- Website ID: Use client’s web ID from their Admin account page
- Account Type: Always choose “Customer”
- Address 1: Address
- Address 2: If client has a “Suite #” it can be added here
- City: City
- State: State
- Postal Code: Postal Code
- Country: If not USA, choose “Other” and type in country manually
- Phone: Use dashes for proper formatting (ex. 888-932-5560)
- E-Mail: Client's email
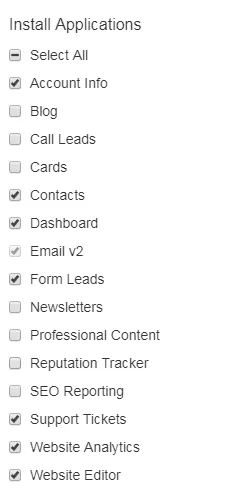
- Default checkboxes are the ones that need to be checked for every account - you will only have to check additional boxes based on marketing packages (onboarders can also complete turning on additional applications)
3. Select “Create”


you will have to wait - do not refresh your screen
4. The profile is created, however setup is still needed! Check the pop up to see if there were any errors.
5. Next, select the tab “Manage Domains”
6. Click on the “New” button to provision a website for this account.
7. Once you hit new, settings will appear. Complete provisioning in the following format:
- Domain Type: Always choose “External”
- Domain: here add the client’s primary domain like so: theonlinepractice.com (no “www.”) and check the box for “Add Website”
- Market: Market
- Expertise: General
- Theme: Theme
- Color: Color
- First Name: Use client’s name (should always be the Dr's name)
- Last Name: Use client’s name (should always be the Dr's name)
Note: Theme & color is pulled from the “Sales With Missing Information” document.
8. Select “Create”
9. Back on the “Domains and Websites” page, select “Settings”
10. Click the “Edit” button for “Content Market & Expertise
11. A pop up will appear. Make sure all checkboxes are selected under “Select AOPs to add” and then hit save. If this is not for a chiropractic or podiatry website, there is no need to do this. This is for medical websites only.
12. Navigate back to the “Manage Applications” tab.
13. You may need to turn on the applications based on the products the client has signed up for.
14. Navigate to the “Manage Staff” tab. This is where you will create login information for the client to access their Portal account.
15. On this page, select “Add User”
16. Fill out the pop-up using the client’s name and e-mail.
- The “Email for Password Recovery” should always be “[email protected]”
- The password should always be “Test123!” (case sensitive) for initial setup
- Click “Save” to be taken to the next pop-up for user creation.
17. Make sure all checkboxes are selected under “Edit Permissions” and click “Save”
18. Once the account has been provisioned:
- Put login information for user in the ticket
- Add the design and color in the ticket
- Add the onboarder in the ticket (include any notes from Full Slate) and also notate the spreadsheet with the onboarder's name
- The design call tickets should be future dated for the onboarder that the appointment is assigned to.
- If a move site ticket, give the ticket to Virgilio and add a due date to the end of the ticket subject. Due date should be the day before the design call - do not
future date the ticket
- Future date and assign any ancillary tickets corresponding to the design call for the date and time of the call in CST.
Use the “SWMI” sheet (appointment time) and Full Slate (onboarder assigned to appointment) for reference.
The account setup process is now complete!